
The posting mechanism for adding content to profiles is standard - it works the same across the platform and is moderated by the user privileges to be able to control who can post where. For example, if your organization is using Clarity as a child sponsorship software, sponsors would be only able to post to their own profile and see the posts created by or through the beneficiary profiles that the sponsor is donating towards. Similarly, whether your beneficiaries have their own access, or if the beneficiary profiles are managed by a delegated administrator of that project/program, they will only be able to add posts to their specific profiles and see content related to the sponsors (donors) that are donating directly to them.
Where to create a post?
Posts happen on the user profile level.
For Organization Administrators:
As an administrator you have the ability to post directly to your community. This means, if you are responsible for keeping your donors updated, you are able to do so by accessing your communities beneficiary profiles and adding a post to each individually. If a beneficiary has multiple donors, you can leverage “audiences” in order to determine who sees what. This could mean that you want to make a general update that all donors of that beneficiary will see, or you could post directly to one of the donors specifically.
Additionally, if you would like to add a post that does not involve a beneficiary and is related to your organization in general, this can be done through the donor’s profile where you can add a post to their feed of updates.
For Donors:
As a donor, you have been provisioned with specific access to Clarity based on the different beneficiary support you have provided. This means that you will be able to see all posts related to you and your donations. If you donate to a student to provide an educational sponsorship, then you will be able to see their posts. If you also donate to a general project of the organization and the organization is keeping their donors updated through Clarity using a project based beneficiary type, then you will also be able to see posts related to that project.
With this, you will also be able to post directly to your profile, and since the organization has connected your account to the beneficiaries you work with, your posts will be able to be seen by those beneficiaries.
The organization can moderate your posts to ensure safety of information being passed from donors to beneficiaries, and you will be notified if posts are not approved through your profile. Lastly, organizations can post directly to your profile, which means that they can provide information to you that is general to the organization and not related to your beneficiaries. This creates a personalized donor experience for you, based on the projects, students, or beneficiaries you choose to support.
For Beneficiaries:
If the organization you are a part of has provided access to beneficiaries managing their own profiles, opening the avenue for direct relationships between donors and sponsors, you will be able to create posts directly from your profile as a beneficiary.
The posting mechanisms are the same between donors and beneficiaries, so please refer to the explanation above in order to understand how your updates can and will occur. Ultimately, you will only be able to post on your own profile, and you will be able to see posts from your donors and the organization itself.
Creating a new post
To add a new post, navigate to your profile, or the profile you are making a post on behalf of (if organizational admin user) - the link to your profile can be found in the top right corner of your screen and is shown in the image below.

Side note: accessing a profile is a bit different for an admin user, instead of following the instructions above, determine if you’d like to access a profile related to a beneficiary or donor, and navigate to their profile through the “Donors” or “Beneficiaries” navigational menu links.
Once you have accessed your profile, or the profile you’d like to update as an admin, you can select “Edit Profile” from the picture above in order to add a post.
Posts are added on the right hand side of the screen from within the profile. Simply click the right arrow beside the word “Posts” in order to access all of the posts associated with the profile you have accessed. From here you can update, delete, or add new posts.

Once you have entered the post’s section of the user profile, you will see a button that says “Add Post” - this is where you can create new posts, which will be seen by the specific people who are provisioned with access to see the posts throughout your community. Simply click the button “Add Post” and you will now be ready to start adding the content to the post you would like to create.

Adding content to a new post
Prior to posting a post to a profile, which will be shared with the audiences that you choose based on the access that the organization has provisioned for that profile, you will need to add content to it. This can be free text, photos, PDFs, or any other typical file type that you may deem necessary to getting your update information across effectively. Once you have followed the instructions above, and have started your “New Post” simply fill out the information shown in the following web form - this form is consistent across the platform and appears for all new posts.
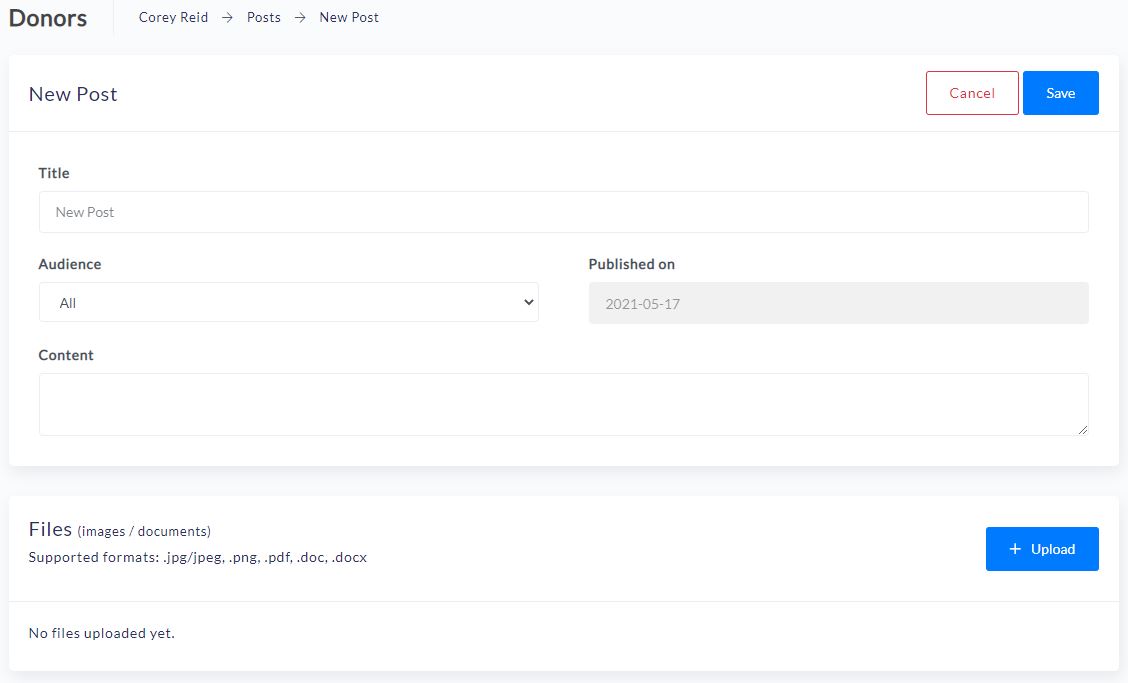
All posts should first be given a title. Once completed, you will want to specify exactly which audience you would like to send the post to. If you are a donor with multiple beneficiaries that you would like to update all at once, simply select “All”. If you would like to send something to a specific beneficiary, then simply select the beneficiary that you would like to send the post to in the audience section. Similarly, if you are a beneficiary or manage the beneficiary profiles on the platform as an organizational administrator, simply choose “All'' if the update information is meant to be shared with every donor who contributes to that beneficiary - or select the specific beneficiary you wish to give a personalized update too.
Published date was added to the form in order to allow users to back-date information if things have gotten busy and the user has forgotten to post the updates on the same day as collecting the content. This gives organizations more flexibility related to when they do their uploading/updating as they will be able to select the specific date that the events occurred, and the post will show up in the viewers update timeline in the correct order, even if uploaded out of order.
Last, when creating the post, you should add specific notes that you’d like the viewer to read in the “Content” section, and upload your files as attachments.
Upon completing, simply “Save” the post!
If your organization uses “Approvals”, prior to the update being able to be seen by either the beneficiaries or the donors update timelines, the organization’s representative that is responsible for moderating content will need to approve the post.
Deleting a Post
Deleting a post is easy with Clarity.
The post will be shown in multiple places. You can find it on your recent posts section of your dashboard (if recently created), or you can find it on the specific profile when you click the right arrow beside the word “Posts” as described above.
Once you find the post, you will see it in the format shown below. This is where you are presented with multiple links that will take you to different locations related to that post. Simply click the highlighted title of the post in order to access that individual post.
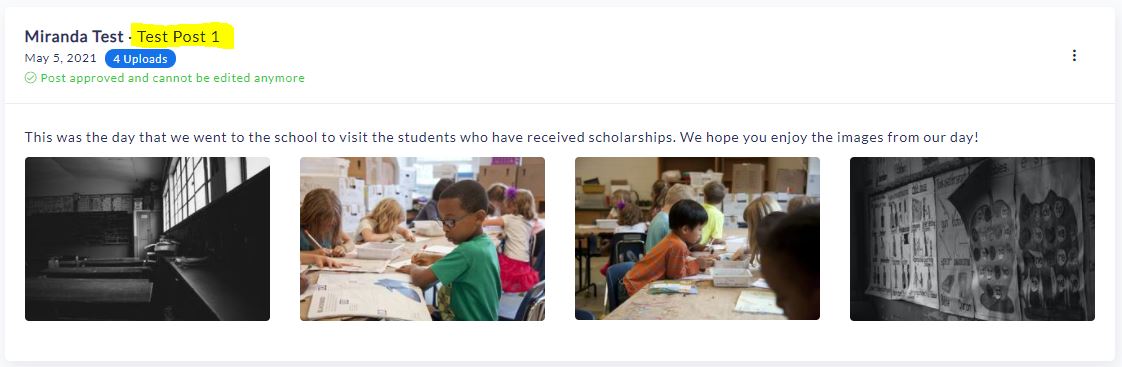
This link will take you to a screen that allows you to delete the post. See below for the specific post information that is shown once you click the title on a specific post title.
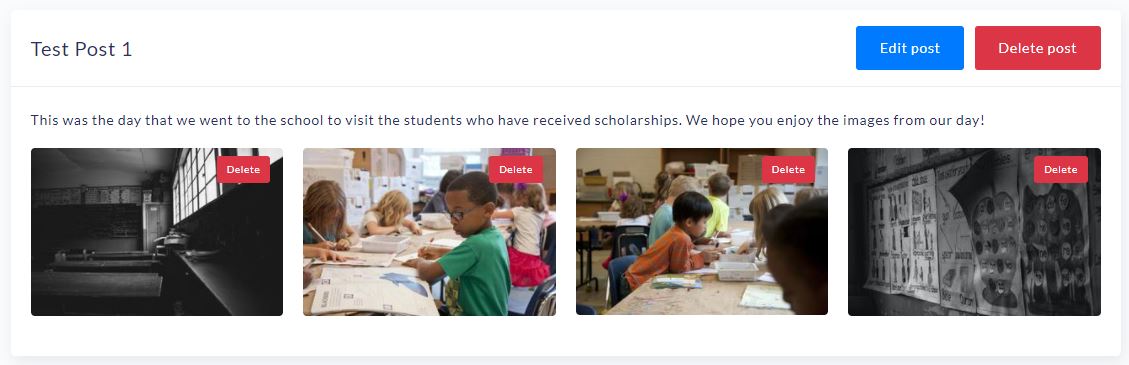
From here, click “Delete Post” and follow the instructions to confirm your post will be deleted.
It is important to mention that once you delete the post, you will not be able to get it back. If you’d rather edit the post, you can click “Edit Post” and get started with that user experience.
We hope this knowledge article was helpful. If you have any questions related to creating or deleting posts, please don’t hesitate to reach out to [email protected] and one of our partner success representatives will be happy to assist you!